Q&A
Q. What are nesting machines?
A.
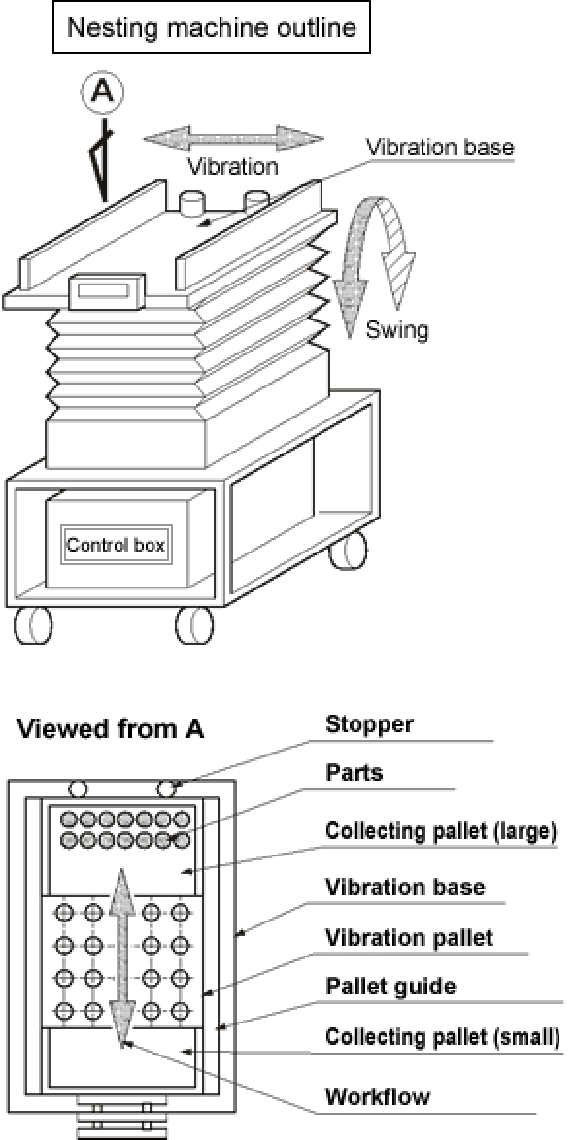

1. The nesting machine has essentially two functions of swing motion and horizontal vibration.
2. The "pallet", the "collecting pallet (large)" and the "collecting pallet (small)" are placed on the vibration base as shown in the figure titled "Viewed from A", then parts are placed on the collecting pallet (large).
3. Switching the nesting machine on starts both swing motion and horizontal vibration, which carry and scatter the parts from the collecting pallet (large), and finally nest them in the shaped holes in the pallet during their reciprocating movement by the swing motion.
4. When the specified number of swings is complete, excess parts are collected in the collecting pallet (large). Now the nesting process is all completed.
5. After the parts are loaded, remove the pallet first, then the collecting pallet (small). You can repeat the nesting process by setting unloaded pallets and turn the "Start"switch on again.
6. One to sixteen pallets can be set depending on the type of nesting machine and the pallet size.
7. In some cases, different types of parts may be nested at the same time by dividing the pallets by columns. The settable number of pallets can also be changed.
Q. What is the purpose of using nesting machines?
A.
The nesting machines are full of activity in the fields of visual inspection, counting, alignment and assembly of parts in various kinds of industries.
Please note that these machines are not designed for fully automatic and unmanned operation, but for saving in time and labor to handle small parts that are hard by manual operation. Though requiring an operator to feed the pallets to the next process, the machines are proud of their high productivities.
- Easy visual inspection
As the parts are aligned in the same direction on one pallet, visual inspections can be carried out for defects such as deformations, scratches and stains, much more easily when compared with randomly placed parts. Besides, the inspector's fatigue is reduced to minimum. If necessary, the both sides of the parts can be inspected in series by transferring them to the reverse pallet. - Simple and correct counting
As the number of the shaped holes in the pallet is known, the parts are counted without error once fully loaded. - Effective preparation
The parts are aligned in one direction in a short time. This offers easy preparation for the following processes.
Example: Heat treatment, electrostatic painting, printing, pre-processes for automatic machines, etc. - Efficient assembly
The assembly methods that Ikeda's nesting machines use are grouped into two; picking up one piece or one row of pieces from the pallet and handling whole pieces on the pallet as a unit.
Example: IC socket assembly, pin assembly of PGA board, transistor pin, glass assembly
Q. What are differences between the bawl feeder and the automatic nesting machine?
A.
Bawl feeder:
- The quantity of handled parts is not so large.
- In most cases, the attachments in the bawl and the feeding devices are dedicatedly designed for specific parts, so it is very difficult or impossible to replace them for different parts. Even if possible, it would require a long setup time.
- It is very difficult to take preventive measures against jams and other problems occurring due to deformed or mixed parts.
- In such a case as one automatic assembly machine uses several part feeders, just one trouble gives progressive decrease to the whole production.
- Additional attachments, devices or mechanisms are required to convey the parts from the supply chute to the next process.
Automatic nesting machine:
- The quantity of handled parts is large (capacity: 10,000 - 100,000 pieces/hour).
- Practically any type of parts is acceptable by simply changing pallets.
- No problem occurs even if deformed parts or foreign matters are mixed.
- The machine is never down.
- Since the parts are aligned on a pallet at a specified pitch, pallet-by-pallet assembly work can be carried out in the next process.
Q. What kinds of parts can be nested?
A.
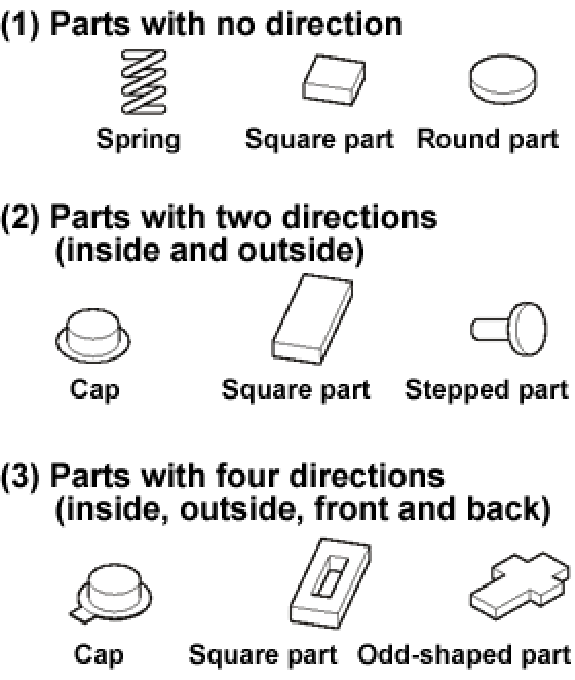
Some examples are given left.
Besides the left-mentioned parts, many more still exist but they can also be aligned in a direction as the nesting machine recognizes the characteristics of the shapes of parts.
Note, however, that since the nesting machine judges different parts by the shapes when aligning, it cannot take the differences in the electrical characteristics and the colors.
Q. How long is the nesting time?
A.
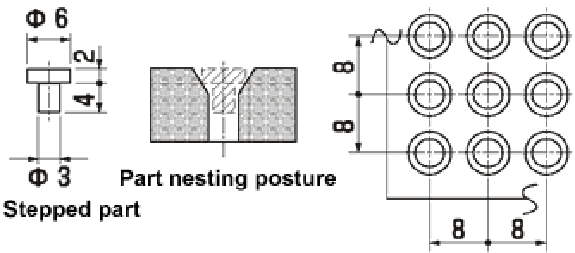
Though the nesting time differs depending on the shape of parts and the nesting direction, it usually ranges from 30 seconds to 3 minutes.
As an example, the capacity of the nesting machine when aligning stepped pins on a 120 mm x 240 mm pallet has been verified as follows:
Supposed that stepped pins are nested on a 120 mm x 240 mm pallet at an 8-mm pitch, then 30 rows x 15 columns = 450 pieces can be aligned.
If two pallets are used at the same time, 450 pieces x 2 = 900 pieces are nested.
Supposed the nesting time is 150 seconds including pallet replacement work, it takes 0.16 seconds per piece.
Q. What is the nesting rate?
A.
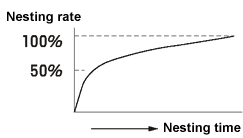
Though the nesting time differs depending on the shape and quantity of the supplied parts, 95% to 100% of them can usually be nested.
Generally, the relationship between the nesting time and the nesting rate is expressed by a curve as shown below:
Though depending on the shape of parts, up to 99% of them can be nested in a short time in many examples. To improve the nesting rate to 99.5%, 99.9% or 99.99%, the nesting time increases synergistically. (Number of swings increases.)
Therefore, the target value is generally set to 99% to 99.5% depending on the characteristics of the next process. Unloaded holes, if any, can be visually found and manually filled to improve productivity.
Since the next pallet can be set on the nesting machine during manual work, you will have no loss of time.
Q. How is the pallet size determined?
A.
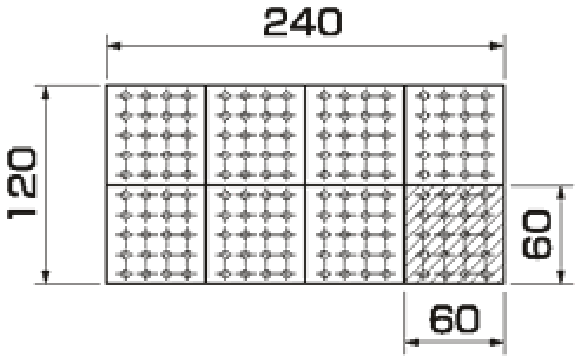
The pallet size is determined according to the carbon jig, the assembly jig, etc. that you are now using.
Needless to say, the parts are assembled on the final jig by adapting the hole pitch and the locate pin positions.
If your final jigs are small, two or more of them may be set on one pallet at the same time.
Example: If the final jig dimensions are 60 x 60 and the pallet dimensions are 120 x 240, then eight jigs are set at the same time:
Q.How are parts assembled?
A.
Several examples of assembling many pieces at the same time are given below.
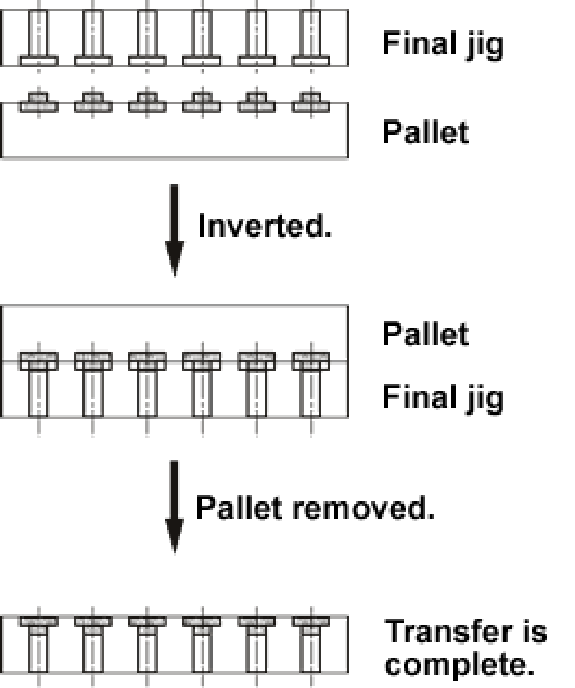
◆Inverting the pieces when they are placed on the final tray:
- The final jig is placed on the pallet and inverted.
- The parts are transferred to the final jig by removing the pallet.
[Notes]
- It takes eight to ten seconds to carry out the above operation.
- The pallet and the final pallet are aligned with locate pins.
- Once the parts are transferred to the final jig, visual inspection can be performed.
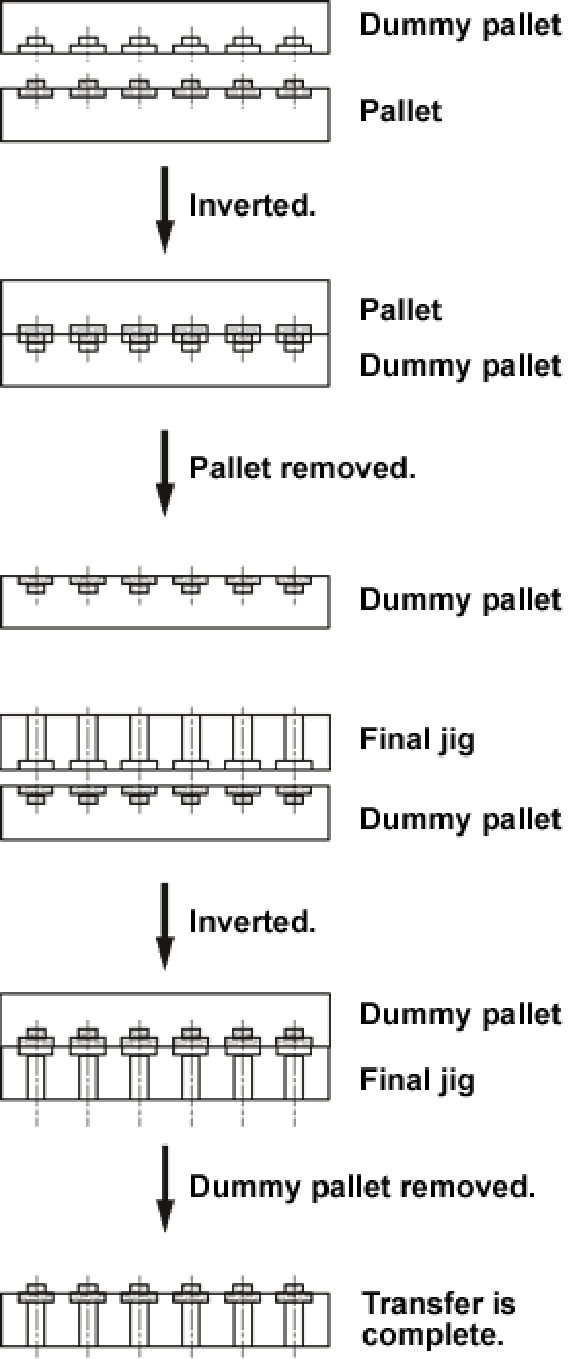
◆Making the final jig and the pallet face in the same direction:
- A dummy pallet is placed on the pallet and inverted.
- The parts are transferred to the dummy pallet by removing the pallet.
- The final pallet is placed on the dummy pallet and inverted.
- The parts are transferred to the final pallet by removing the dummy pallet.
[Notes]
- It takes 15 to 20 seconds to carry out the above operation.
- The pallet and the final jig are aligned with locate pins.
- When the parts are transferred to the dummy pallet, visual inspection can be performed.
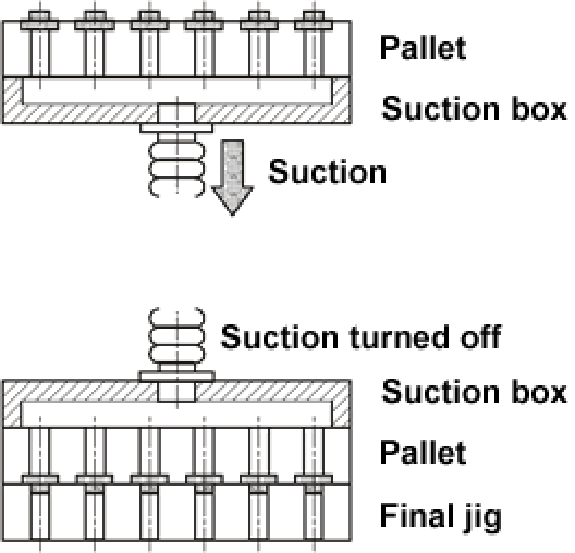
◆Transferring the parts by means of a suction unit(1):
- The pallet is placed on the suction box and the suction power is turned on. (The pallet and the parts are both sucked through the suction holes.)
- While sucked, the parts are placed on the final jig.
- The parts are transferred to the final jig by turning the suction power off and removing the pallet.
[Notes]
- It takes 15 to 20 seconds to carry out the suction transfer operation.
- The pallet and the final pallet are aligned with locate pins.
- A suction source is necessary separately.
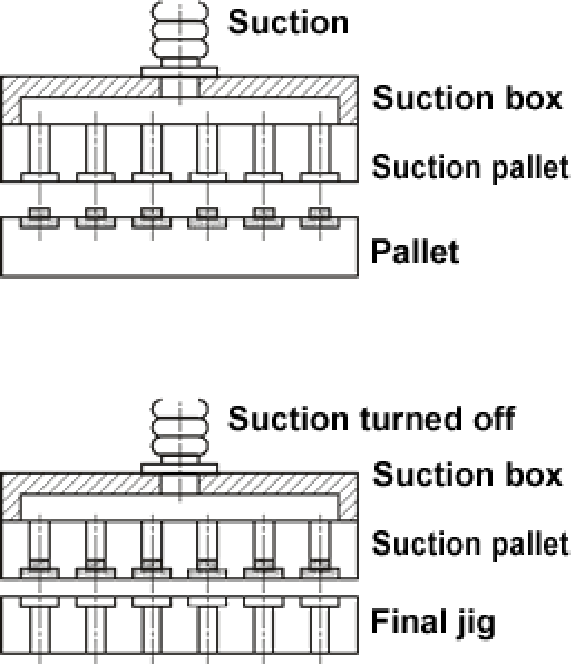
◆Transferring the parts by means of a suction unit(2):
- The suction pallet is placed on the pallet and the suction power is turned on. (Only parts are sucked through the suction hole.)
- While sucked, the parts are placed on the final jig.
- The parts are transferred to the final jig by turning the suction power off and removing the pallet.
[Notes]
- It takes 8 to 10 seconds to carry out the suction transfer operation.
- The pallet and the final pallet are aligned with locate pins.
- A suction source is necessary separately.
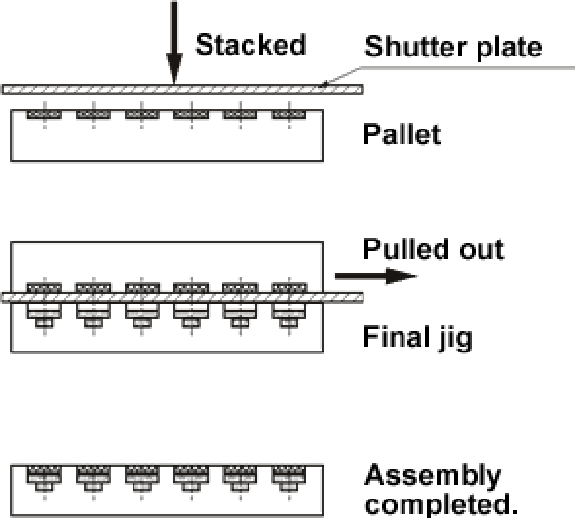
◆Using a shutter plate(1):
- A shutter plate is placed on a pallet, then the both are inverted and placed on the final jig.
- The shutter plate is pulled out.
- The parts are transferred to the final jig by removing the pallet.
[Notes]
- Generally, the operation time is 8 to 10 seconds when the shutter plate is used.
- The pallet and the final pallet are aligned with locate pins.
- Thin parts are likely to be caught between the shutter plate and the pallet.
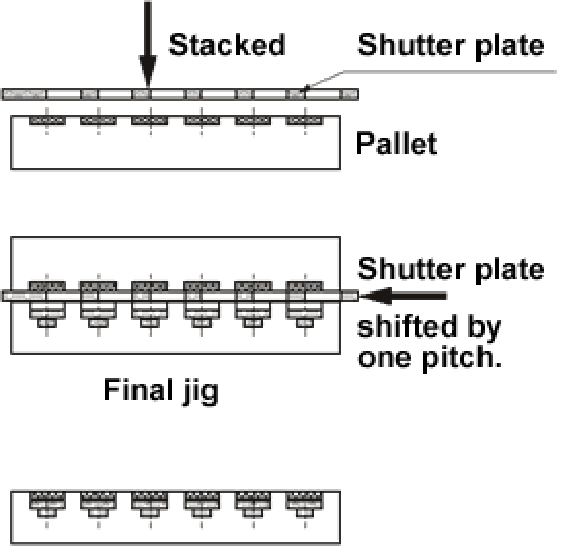
◆Using a shutter plate(2):
- A shutter plate is placed on a pallet, then the both are inverted and placed on the final jig.
- The shutter plate is shifted by one pitch.
- The parts are transferred to the final jig by removing the pallet.
[Notes]
- Generally, the operation time is 8 to 10 seconds when the shutter plate is used.
- The pallet and the final jig are aligned with locate pins.
- Thin parts are likely to be caught between the shutter plate and the pallet.
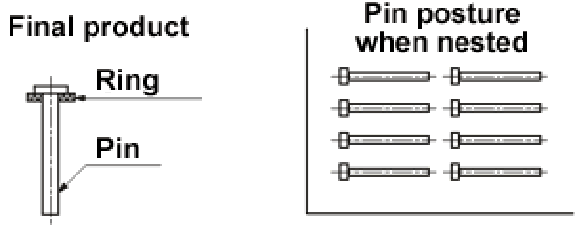
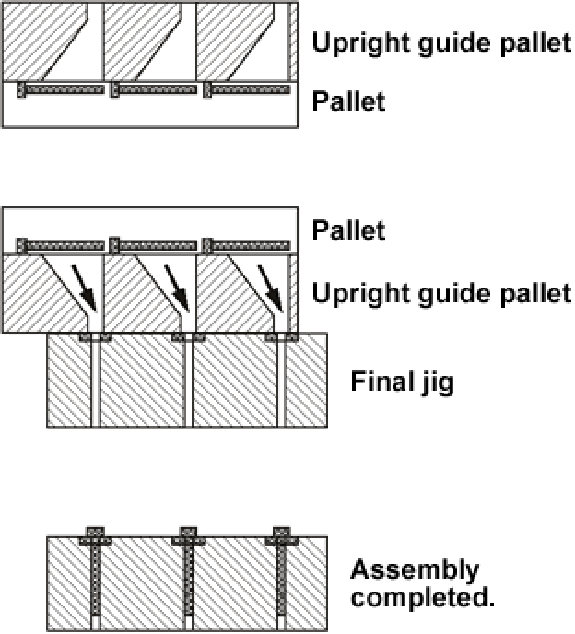
◆Making horizontally nested parts upright:
- The upright guide pallet is placed on the pallet, then the both are inverted and placed on the final jig.
- Pins are transferred to the final jig through the upright guide pallet once the pallet is removed.
[Notes]
- Generally, the operation time is 8 to 10 seconds when the shutter plate is used.
- The pallet, the upright guide pallet and the final pallet are aligned with locate pins.
- This method is used to place pins in position in assembly of such components as IC sockets, connectors and PGA packages. Conditions including the number and shape of the pins and the patterns can be changed by simply changing the pallets, leading to total cost reduction.
Q. Can the parts nested with the nesting machine be transferred automatically to the final jig?
A.
Since numberless of user specifications exist for automatic nesting machines, typical examples are given below.
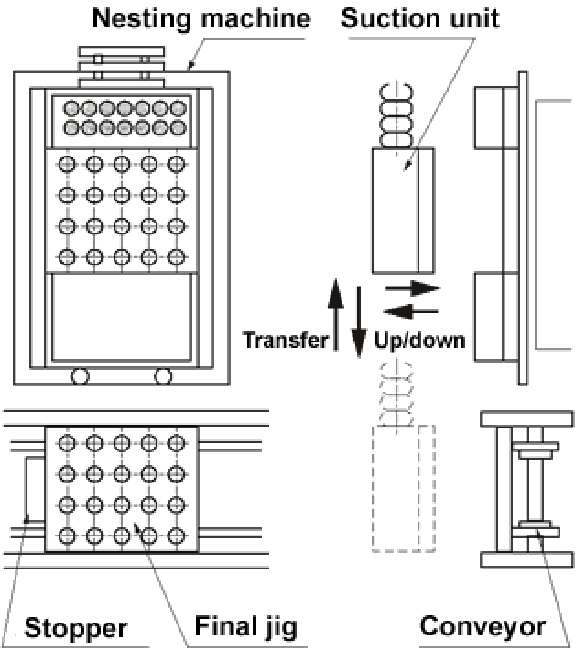
[Overview]
- When the nesting machine starts, the conveyor transfers the final jig to the transfer position.
- When the nesting machine stops, the suction box lowers and starts sucking the parts.
- After the suction operation, the suction box goes up to the final jig. The nesting machine restarts at the same time.
- The suction box goes down to the final jig and turns suction off.
- The suction box goes up to the origin point.
- After the transfer is completed, the final jig is discharged and an empty final jig is supplied.
This operation is repeated.
[Reference]
- You can change the type of parts by simply using different pallets including suction pallets.
- You can assemble several parts on the final jig in order if connecting several automatic part transfer machines.
- We offer various solutions for final jig supplying/discharging. Please consult us.


